Timber Staircase Construction Details
In order to construct a perfect staircase, consideration should be given on existing space, type of material and budge.
In this civil engineering tutorial, you will get step-by-step guidelines on how to construct a wooden staircase.
Materials
Different types of tools are required to construct a new staircase which range from hammer, circular saw, drill, chalk line, level, framing square, PPE, handsaw, stair gauge, 2 x 6, 2 x 12, decking, screws etc.
Landing Zone
While constructing new stairs, the first thing is to find out the starting point & finishing point of the stairs. Then, verify that there are adequate space at both ends for rising up securely or minimum 24 inches space exists for being utilized as the landing area. Landing space requirements are based on local building codes and it is recommended to abide by your local code regulations.
ALSO READ :
Determine Rise
Now find out the rise or the height of stair. Calculate the total rise to the landing spot maintaining a level of 2 x 4. Ensure that the 2 x 4 expands all the way to the area where the ground level is located, thus you will get the proper measurement from the bottom part of the 2x4 to the ground level. The angle among both landings should remain across 40 degrees, at a maximum. It will be the measurement of entire stair rise.
Find Out Number Of Risers
Now, utilize the above measurement and divide it with minimum 7 inches. The 7 inch number demonstrates the fairly accurate step height. The number obtained after division, will be the number of required risers.
Find Out Number Of Treads
Now, determine the number of treads by deducting one from the number of risers, since there always exist one fewer tread as compared to risers. Multiply the number of treads with 10.25 inches wide, or the same as two 2x6s. Properly, calculate the horizontal anticipated distance from the top landing to the bottom landing. Reexamine all the measurements and try to draw a simple sketch to ensure that you get exact number of treads and risers.
Stringer
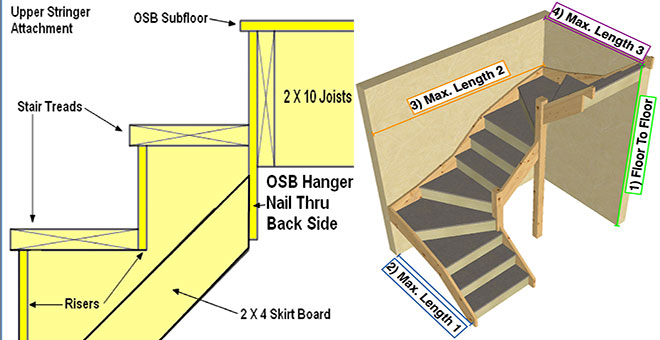
Put a mark on the bottom landing where the stair will actually be closed. Calculate to find out the length of stringer and skirt. Select the stringer or the 2x12 and provide them on top of a sawhorse to outline the place where the riser and treads will be situated. Outlay the stairs by creating drawing on the exterior of the framing square, sliding the square across unless it joins the last mark. Remove ¾ in from the top of the stringer to accommodate the missing top riser. Mark the bottom of the stringer to eliminate the tread thickness. By applying a circular saw, cut the top and bottom of the stringer. Put the stringer into exact place and ensure the tread level.
Cut the Stringer
Cutting should be done across your mark and stop while attaining the corner of the notch. Apply a hand tool to complete to get rid of damaging the stringer. Apply the first stringer as a pattern to cut the following stringers.
Skirt Boards
Layout the pattern on the skirt board. Cut off the end of the bottom and keep it about 5 inched high. Join stringers to the skirts with deck screws to be arranged each 8 inches, changing from the front and back. In case of a middle stringer, reinforce it with extra 2x4 fixed to both sides of it.
Fixing Stringers
Mark the left and right location of the skirts as well as horizontal lines to mark the top treads location. Nail the skirts and screw the skirts to the top landing surface. Affix a 2x6, keeping similar width of the stringer, to the back of the stringer for extra support.
Attach the Risers/Steps
Connect the bottom riser into each stringer and verify the squareness of the stair. Fix the second riser and screw on the two 2x6 bottom treads keeping a ¼ inch space among the boards. Attach all risers and treads up to the top of the stairs. The bottom riser will probably require to be cut to custom height.
For online demonstration of staircase construction, go through the following video tutorial.

